This is nominally a “travel blog”, or something, but I also write code, and sometimes screensavers, so I thought I’d try putting this out there to see how it goes. Let me know what you think! mail@tolar.town or on twitter @tolar.
Writing screensavers for macs is a little weird. But once you get past a few oddities, it can be lots of fun!
For purposes of this post, I assume you have some knowledge of and experience with Xcode and Swift. We’ll build a simple screensaver that spins a green square.
If you want to go ahead and download the complete source, you can find it on GitHub.
Setup your project
Let’s start with your Xcode project setup before we dive in to code: File -> New project. In the project template selection screen, select macOS -> Screen Saver.
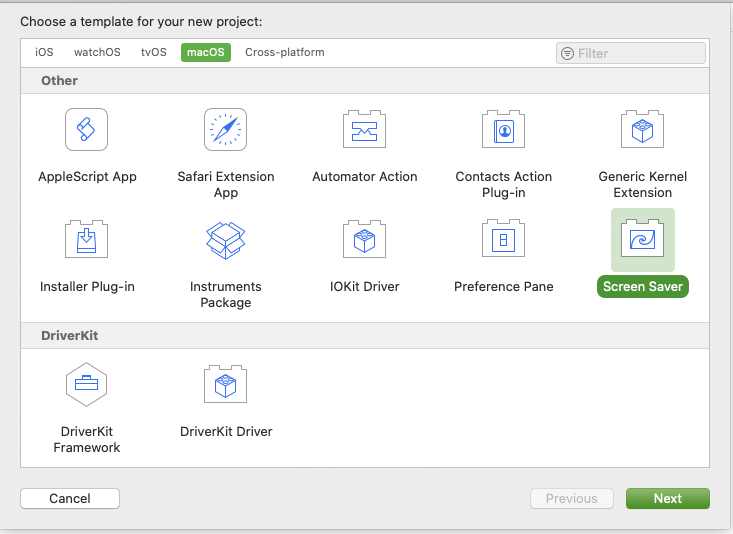 Project selection
Continue with setup until you have a project. Xcode will generate an Objective-c subclass of ScreenSaverView for you, but that’s no fun. Swift is the new hot thing, right? Go ahead and delete those files (***View.h and ***View.m). Create a new Swift file. Here we call it GreenSquareScreenSaverView, but you can name it as you please. (Note: if you change the name of the class, be sure to also update it in your Info.plist “Principal class” key.) You can use this stub code:
import Foundation
import ScreenSaver

class GreenSquareScreenSaverView: ScreenSaverView {
    override init?(frame: CGRect, isPreview: Bool) {
        super.init(frame: frame, isPreview: isPreview)
        self.animationTimeInterval = 1 / 30.0
    }

    required init?(coder: NSCoder) {
        fatalError("init(coder:) has not been implemented")
    }

    override func startAnimation() {
        super.startAnimation()
    }

    override func stopAnimation() {
        super.stopAnimation()
    }

    override func draw(_ rect: NSRect) {
        super.draw(rect)
    }

    override func animateOneFrame() {
    }
}
Congrats, you have a functional screensaver! It might not do much apart from showing a blank screen, but it’ll build.
Install your screensaver
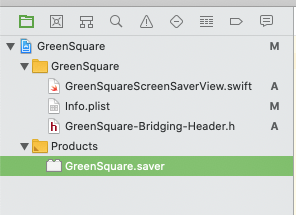
One major difference between screensavers and apps is that you can’t simply “Run” from Xcode. To install the screensaver:
- Build from Xcode.
- Find the screensaver file under “Products”.
- Right-click on it & select “Open with External Editor.”
- This will open System Preferences and install the screensaver. (The first time, you’ll have to select the screensaver here).
 Install the screensaver
Add a mac app target to make testing easier
Troubleshooting screensavers is a pain in the butt. I highly recommend doing the bulk of your development using a mac app target. Then make sure to test it in screensaver mode, as this is treated a bit differently by macOS.
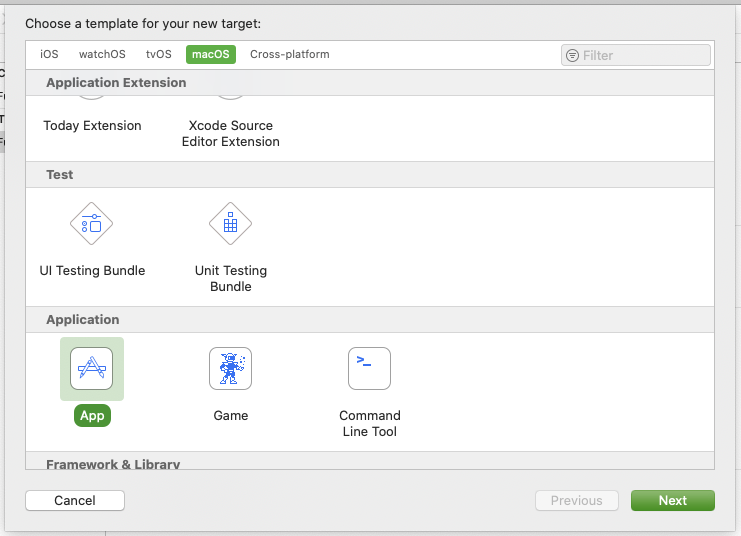
First, add a new target:
- Select your project on the left.
- Under “Targets”, at the bottom select the “+” button.
- Under “macOS”, select “App”.
- Continue with the prompts. I suggest naming it something like “Preview”.
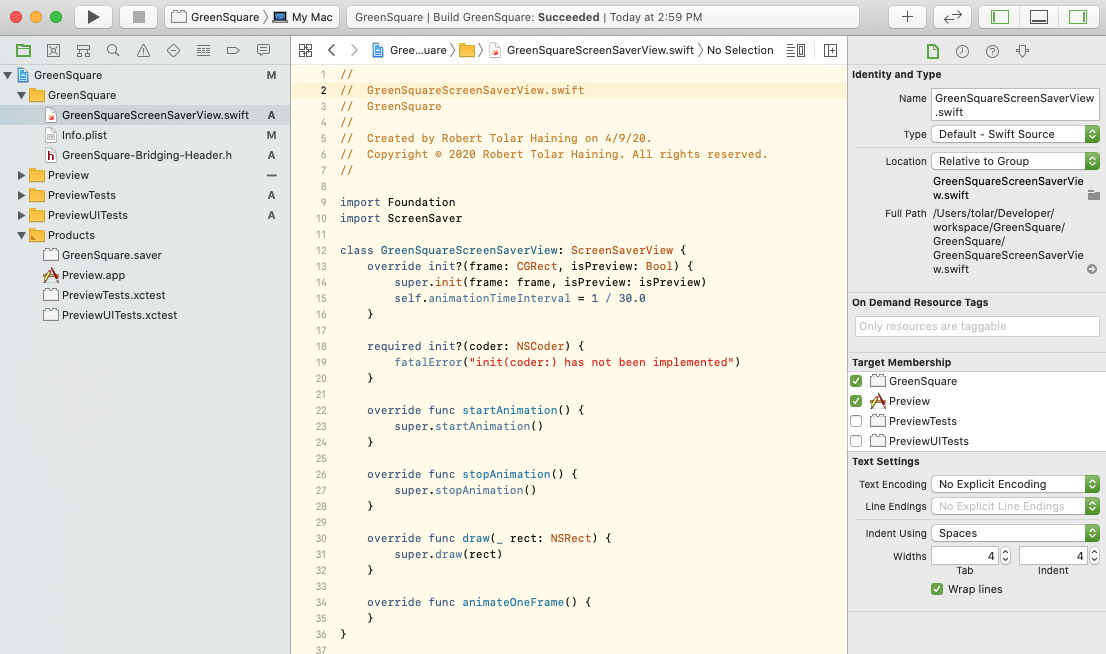
Hook up your mac app to the screensaver code you have. We need to expose the screensaver view class (and any other code you have written or will write):
- Select the file(s) on the left.
- On the right, select the File Inspector icon
- Under “Target Membership”, make sure your screensaver & mac app are selected.
 Fix target membership
You’ll need to fake the animation in the mac app. Here is some stub code for a view controller (this should only have the mac app as a target):
import AppKit

class PreviewViewController: NSViewController {
    var screensaverView: GreenSquareScreenSaverView? = nil

    var timer: Timer? = nil

    var isAnimating: Bool = false {
        didSet {
            toggleAnimationTimer()
        }
    }

    override func loadView() {
        screensaverView = GreenSquareScreenSaverView(frame: CGRect.zero, isPreview: true)
        self.view = screensaverView ?? NSView()
    }

    override func viewDidAppear() {
        super.viewDidAppear()

        isAnimating = true
    }

    override func viewWillDisappear() {
        super.viewWillDisappear()

        isAnimating = false
    }

    private func toggleAnimationTimer() {
        if isAnimating {
            if timer == nil {
                timer = Timer.scheduledTimer(withTimeInterval: 1/30.0, repeats: true) { [weak self] (_) in
                    self?.animate()
                }
            }
        } else {
            if let timer = timer {
                timer.invalidate()
                self.timer = nil
            }
        }
    }

    func animate() {
        if isAnimating, let screensaverView = screensaverView {
            screensaverView.animateOneFrame()
        }
    }
}
Then in your AppDelegate, you can instantiate your PreviewViewController and pass it to the window:
import Cocoa

@NSApplicationMain
class AppDelegate: NSObject, NSApplicationDelegate {

    var window: NSWindow!
    var previewViewController: PreviewViewController?

    func applicationDidFinishLaunching(_ aNotification: Notification) {
        let previewViewController = PreviewViewController()
        self.previewViewController = previewViewController

        // Create the window and set the content view.
        window = NSWindow(
            contentRect: NSRect(x: 0, y: 0, width: 800, height: 600),
            styleMask: [.titled, .closable, .miniaturizable, .resizable, .fullSizeContentView],
            backing: .buffered, defer: false)
        window.center()
        window.setFrameAutosaveName("Main Window")
        window.contentView = previewViewController.view
        window.makeKeyAndOrderFront(nil)
    }
}
Now if you build & run the Preview mac app, you’ll have your screensaver running inside the app, and tied to Xcode for debugging, stepping through code, troubleshooting, etc.
You should see a single window with a black background color.
Write code!
If you want to eventually port your code to iOS or tvOS, you may want to stick with something like layers (CALayer) that are easy to use cross-platform. But if you’re focused on screensavers, AppKit is the mac corollary of UIKit, which you might be familiar with if you’ve built iOS apps. NSView and NSViewController are your friends!
For now, let’s add a little green square and rotate it, so you don’t have to stare at a blank screensaver. Create a new Swift file GreenSquareView:
class GreenSquareView: NSView {
    init() {
        super.init(frame: .zero)
        wantsLayer = true
        layer?.backgroundColor = NSColor.green.cgColor
    }

    required init?(coder: NSCoder) {
        fatalError("init(coder:) has not been implemented")
    }
}
Let’s update a few things in your ScreenSaverView subclass. Create a property:
let greenSquareView = GreenSquareView()
Then, in the init(), add:
addSubview(greenSquareView)
We’ll resize the frame in draw():
    override func draw(_ rect: NSRect) {
        super.draw(rect)

        var squareFrame = NSRect.zero
        squareFrame.size = NSSize(width: 150, height: 150)
        squareFrame.origin.x = (rect.width - squareFrame.width) / 2.0
        squareFrame.origin.y = (rect.height - squareFrame.height) / 2.0
        greenSquareView.frame = squareFrame
    }
And we can animate it in the stub animateOneFrame():
    override func animateOneFrame() {
        greenSquareView.rotate(byDegrees: 1)
    }
So if we put that together, our GreenSquareScreenSaverView now looks like:
import Foundation
import ScreenSaver

class GreenSquareScreenSaverView: ScreenSaverView {
    let greenSquareView = GreenSquareView()

    override init?(frame: CGRect, isPreview: Bool) {
        super.init(frame: frame, isPreview: isPreview)
        self.animationTimeInterval = 1 / 30.0
        addSubview(greenSquareView)
    }

    required init?(coder: NSCoder) {
        fatalError("init(coder:) has not been implemented")
    }

    override func startAnimation() {
        super.startAnimation()
    }

    override func stopAnimation() {
        super.stopAnimation()
    }

    override func draw(_ rect: NSRect) {
        super.draw(rect)

        var squareFrame = NSRect.zero
        squareFrame.size = NSSize(width: 150, height: 150)
        squareFrame.origin.x = (rect.width - squareFrame.width) / 2.0
        squareFrame.origin.y = (rect.height - squareFrame.height) / 2.0
        greenSquareView.frame = squareFrame
    }

    override func animateOneFrame() {
        greenSquareView.rotate(byDegrees: 1)
    }
}
Animation
The ScreenSaverView class offers you a straightforward way to animate, if what you want to do involves regular updates, like a rotating green square. But that should not restrict you from doing your own CoreAnimation or NSAnimation.
Swift classes: beware, beware, be aware
There’s a fun little bug where sometimes when you create a Swift class, macOS will try to instantiate it as a ScreenSaverView. Your screensaver will quietly crash, but you’ll see a black screen. You can dive into the Console.app, where you might find that it’s trying to call:
-[GreenSquare.GreenSquareView initWithFrame:isPreview:]: unrecognized selector sent to instance 0x7fd13af16950
Fortunately, there’s an easy fix!
Back in Xcode, select your project on the left, then your screensaver target, then “Build Phases”. Under “Compile Sources”, ensure that your ScreenSaverView subclass is the first Swift file.
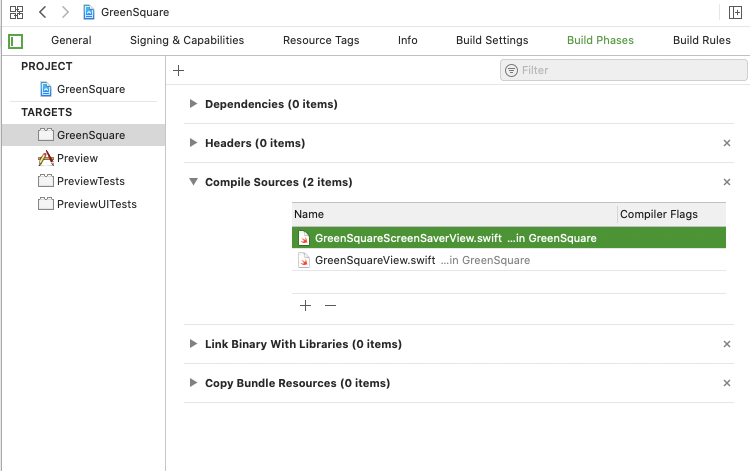 Fix Build Phases
Code!
The code mentioned here is over on github.com/rhaining/screensaver-demo.
 App preview
What else?
What else do you want to learn? Hit me up: mail@tolar.town or on twitter @tolar.
Other screensavers
I’ve published a couple of screensavers this year, if you want to check them out.
- Presidential Hopefuls visualizes polling data in a fun, weird way.
- Zooooom is a parody of a zoom call that I built with my friend Harper. You can check out the source code at github.com/rhaining/zooooom-screensaver.
Check them out and let me know what you think!